

Change Text on XP Start Button Step 1 - Modify Explorer.exe FileIn order to make the changes, the file explorer.exe located at C:\Windows needs to be edited.Since explorer.exe is a binary file it requires a special editor. For purposes of this article I have used Resource Hacker. Resource HackerTM is a freeware utility to view, modify, rename, add, delete and extract resources in 32bit Windows executables and resource files (*.res). It incorporates an internal resource script compiler and decompiler and works on Microsoft Windows 95/98/ME, Windows NT, Windows 2000 and Windows XP operating systems.get this from http://delphi.icm.edu.pl/ftp/tools/ResHack.zipThe first step is to make a backup copy of the file explorer.exe located at C:\Windows\explorer. Place it in a folder somewhere on your hard drive where it will be safe. Start Resource Hacker and open explorer.exe located at C:\Windows\explorer.exe.The category we are going to be using is "String Table". Expand it by clicking the plus sign then navigate down to and expand string 37 followed by highlighting 1033. If you are using the Classic Layout rather than the XP Layout, use number 38. The right hand pane will display the stringtable. We’re going to modify item 578, currently showing the word “start” just as it displays on the current Start button.There is no magic here. Just double click on the word “start” so that it’s highlighted, making sure the quotation marks are not part of the highlight. They need to remain in place, surrounding the new text that you’ll type. Go ahead and type your new entry. In my case I used Click Me!You’ll notice that after the new text string has been entered the Compile Script button that was grayed out is now active. I won’t get into what’s involved in compiling a script, but suffice it to say it’s going to make this exercise worthwhile. Click Compile Script and then save the altered file using the Save As command on the File Menu. Do not use the Save command – Make sure to use the Save As command and choose a name for the file. Save the newly named file to C:\Windows.Step 2 – Modify the Registry!!!make a backup of your registry before making changes!!!Now that the modified explorer.exe has been created it’s necessary to modify the registry so the file will be recognized when the user logs on to the system. If you don’t know how to access the registry I’m not sure this article is for you, but just in case it’s a temporary memory lapse, go to Start (soon to be something else) Run and type regedit in the Open field. Navigate to:HKEY_LOCAL_MACHINE\ SOFTWARE\ Microsoft\ Windows NT\ CurrentVersion\ WinlogonIn the right pane, double click the "Shell" entry to open the Edit String dialog box. In Value data: line, enter the name that was used to save the modified explorer.exe file. Click OK.Close Registry Editor and either log off the system and log back in, or reboot the entire system if that’s your preference. If all went as planned you should see your new Start button with the revised text.
Add Your name on taskbar
 Heres a trick to add up ur name in place of AM and PM beside time and make urself to feel proud among ur group of frnds.Its simpleStart -> Control Pannel -> Regional and LAnguage option -> Customize (beside English US) ->Go to TIME tab -> Change AM symbol and PM symbol from AM and PM to ur name ->Apply -> Ok ...IS it changed ??? Might be not ...Now go to time in taskbar and Double Click it to open "Date and time property"...Look place where time chnges in digital form i.e. 02:47:52 AM , click to arrow to cnage the AM or PM by selecting and press arrow. It will Show ur name or name that was entered by u, Apply -> OKThats it
10 winxp timesaver tips 1.Change the font Windows XP displays in Windows ExplorerNote: This tip is for both Windows XP Home and Professional.Windows Explorer and My Computer display the same font that Windows XP uses for icon titles on your desktop: 8-point Tahoma. If you want to change the font or font size used in Windows Explorer, follow these steps:1. Access the Display Properties dialog box by right-clicking the desktop and selecting the Properties command.2. Select the Appearance tab and click the Advanced button.3. Select Icon from the Item drop-down list.4. Use the Font drop-down arrow to select a font from the list.5. Click OK twice—once to close the Advanced Appearance dialog box and once to close the Display Properties dialog box.You can see the new font by launching Windows Explorer or My Computer. If you don't like what you see, simply repeat the steps and select a different font.2.Prevent a shutdown of a Windows XP systemThis tip applies to both Windows XP Home and Windows XP Professional. Since editing the registry is risky, be sure you have a verified backup before saving any changes.By default, at three o’clock every morning Windows XP’s Automatic Updates tool contacts the Windows Update site and automatically downloads and installs updates for your system. However, that can't happen if other people who use the computer shut it down at the end of the day. Fortunately, you can prevent anyone from shutting down Windows XP with a little registry tweak. Here’s how:1. Launch the Registry Editor (Regedit.exe).2. Go to HKEY_CURRENT_USER\ SOFTWARE\Microsoft\Windows\CurrentVersion\Policies\Explorer.3. Right-click the Explorer subkey and select New | DWORD Value.4. Name the key NoClose and press Enter twice.5. Type 1 in the Value Data text box and click OK.To enable the setting, close the Registry Editor and restart your system. Once your system restarts, you will not be able to it shut down by clicking the Shutdown button on the Start menu. This will prevent most users from inadvertently shutting down the computer.When you do want to shut down your system, just access Task Manager by pressing Ctrl + Alt + Delete, then pull down the Shut Down menu and select the Turn Off command.3.Off hours: Put your name in the Windows XP notification areaDuring those times when the urgent need for high-powered technical intelligence wanes a bit—especially on a slow Friday afternoon—try this fun trick and amaze your colleagues. Here’s how to make your “own” time by putting your name in the notification area:1. Access the Control Panel from the Start menu.2. Double-click Regional And Language Options.3. Click the Customize button in the Standards And Formats panel of the Regional Options tab.4. When the Customize Regional Options dialog box appears, select the Time tab.5. In the AM Symbol and PM Symbol boxes, you can replace that text with your name or whatever word you want, as long as it's no longer than 12 characters.6. To complete the operation, click OK twice—once to close the Customize Regional Options dialog box and once to close the Regional And Language Options dialog box.You’ll instantly see your name appear in the notification area right next to the time.4.Create your own special characters in Windows XPHave you ever wanted to create your own font or maybe just a special character—for example, a character showing your initials for approving documents with your “signature”? You can easily create your own characters using a hidden Windows XP tool called the Private Character Editor. Here’s how:1. Press Windows + R to open the Run dialog box.2. Type eudcedit in the Open text box and click OK.3. When the Private Character Editor launches, you’ll see the Select Code dialog box. Click OK.4. A user interface that looks and works very much like Paint will appear. Here, you can use standard tools to create your characters. 5.When you finish, select the Save Character command on the Edit menu.Once you save your new character, you can access it using the Character Map tool. Here’s how:1. Press Windows + R to open the Run dialog box.2. Type charmap in the Open text box and click OK.3. When the Character Map appears, select the Font drop-down list and select All Fonts (Private Characters).4. Select your character, click the Select button, and then click the Copy button.You can now paste your font character into any document that you want.5.Automatically generate and assign strong passwords in Windows XPThis tip applies to both Windows XP Home and Windows XP Professional systems in either a stand-alone or peer-to-peer workgroup configuration.Computer users consistently use very simplistic logic when creating passwords. For example, many of us choose meaningful words, personal dates, or a word commonly found in the dictionary because it makes the password easy to remember. These common practices cause us to sacrifice the security that passwords are intended to provide.If you’re really at a loss when it comes to thinking of a strong password, you can let Windows XP create and assign a random password to your account. To let Windows XP generate your password, follow these steps.Warning: Before you follow these steps, please be sure that you are paying careful attention and are ready to actually use a password that might not be as memorable as you’re accustomed to! Also, you cannot use this tip on a Windows Serverdomain.1. Open a Command Prompt window and type:net user username /random (username is your login account name)2. Press Enter. Windows XP will randomly generate a secure password, as well as assign that strong password to your account. Windows XP will also display the strong password so you can remember it.At your discretion, you may want to create a Password Reset Disk at this point. This disk will allow you to gain access to your computer in the event you forget your password. Here’s how to create the disk:1. Open the Control Panel and double-click the User Accounts tool.2. Click your account icon.3. Select Prevent A Forgotten Password under Related Tasks.4. Follow the instructions provided by the wizard.6.Quickly gather MAC addresses in Windows XP with ARPThis tip applies to both Windows XP Home and Professional.When securing a wireless Windows XP network, in addition to using Wired Equivalent Privacy (WEP) or Wi-Fi Protected Access (WPA) encryption, you can use Media Access Control (MAC) address filtering.When you enable MAC address filtering, the wireless access point or wireless router verifies that the network card in the computer requesting access has a MAC address in its filter list before allowing the computer to access the network. This means that you must first obtain the MAC addresses of each client computer. To do so, you might think that you have to manually visit each computer and use the Getmac command.An easier way to gather MAC addresses is to take advantage of the Address Resolution Protocol (ARP) command. Here’s how:1. From one computer, use the Ping command to ping each of the other client computers that will connect to the wireless access point or wireless router.2. Type the ARP command along with the -a parameter:Arp -aWhen used with the -a parameter, the ARP command displays the ARP cache, which stores the IP and MAC addresses of the computers that most recently accessed the system—or in this case, those computers that responded to the Ping command.7.Create an old-time monochrome command prompt in Windows XPThis tip applies to both Windows XP Home and Windows XP Professional.In what some may call the olden days, before there were fancy graphical user interfaces and RGB monitors, early computer monitors were monochrome, meaning that they displayed only one color on a black background. Monochrome monitors were available in three colors: green, amber, and white.When you open up a Command prompt in its default configuration, it comes up in a white monochrome configuration with white text on a black background. If you’re like most command line users, you’ve changed the color scheme from the Color tab on the Command Prompt Properties dialog box to make the screen more appealing.However, if you’re ever feeling nostalgic when working from a Command Prompt, you can change the settings on the Color tab to emulate the old green monochrome or amber monochrome monitors. Here’s how:1. Open a Command Prompt window.2. Right the title bar and select the Properties command.3. Select the Colors tab.4. Select the Screen Background button and select the black box in the color palette.5. Select the Screen Text button.6. To emulate an old green monochrome monitor, select the green box in the color palette, and then in the Selected Color Values panel use the spin button for the Green setting to move the number up to 255. Make sure that the settings for the Red and Blue remain at 0.7. To emulate an old amber monochrome monitor, select the green box in the color palette, and then in the Selected Color Values panel use the spin button for the Red setting to move the number up to 185. Make sure that the settings for the Green remains at 128 and Blue remains at 0.8.Taking a fresh look at the Windows XP Task paneThis tip applies to Windows XP Home and Windows XP Professional.If you’re like most Windows XP aficionados, chances are good that you prefer the Folders pane in Windows Explorer to the Task pane that displays by default in My Computer. As a result, you probably avoid My Computer or simply click the Folders button on the toolbar each time you open My Computer. If this is the case, you’ve probably never spent much time looking at the commands on the Task pane and may be missing many handy command shortcuts.For example, how many times have you dug into the Control Panel to access Add/Remove Programs? If you use the Task pane in My Computer, you can simply click Add Or Remove Programs in the System Tasks section. And if you open a drive from My Computer, you will find another command that you frequently use in the Files And Folders section of the Task pane: the Make A New folder command.When you select a folder, you can copy and move folders anywhere on your hard disk easily by selecting the Copy This Folder or Move This Folder command. When you do, a Browse dialog box will appear. This essentially serves as an alternate version of the Folders pane in Windows Explorer.When you select a file, you can choose either the Copy This File or Move This File command and get the same Browse dialog box with a Folders pane.9.Removing unused device drivers from Windows XP machinesWhen you install a device driver on a Windows XP machine, the operating system loads that driver each time the computer boots regardless of whether the device is present—unless you specifically uninstall the driver. This means that drivers from devices that you have long since removed from your system may be wasting valuable system resources.Follow these steps to view and remove these unnecessary device drivers:1. Press Windows + Break to bring up the System Properties dialog box.2. Select the Advanced tab and click the Environment Variables button.3. Click the New button below the System Variables panel.4. In the New System Variable dialog box, type devmgr_show_nonpresent_devices in the Variable Name text box and 1 in the Variable Value text box.5. Click OK to return to the System Properties dialog box and then click OK again.6. Select the Hardware tab and click the Device Manager button.7. In Device Manager, go to View | Show Hidden Devices.8. Expand the various branches in the device tree and look for the washed out icons, which indicate unused device drivers.9. To remove an unused device driver, right-click the icon and select Uninstall.10.Using the Windows Installer CleanUp UtilityNot able to remove or uninstall an application in Windows XP using either the Uninstall option or the Add/Remove Programs tool? Try using the Windows Installer CleanUp Utility. As long as you installed the application using the Windows Installer, this utility will remove all the folders, files, registry keys, and entries from your system and allow you to start over with a clean slate.Here's how:1. Download the Windows Installer CleanUp Utility from the Microsoft Download Center .2. Locate and run msicuu2.exe to install the Windows Installer CleanUp Utility.3. Locate and launch the Windows Installer CleanUp Utility on the Start menu.4. From the Windows Installer CleanUp Utility window, locate the application in the list and click the Remove button.5. Once the application has been removed, click the Exit button to close the utility.You can now reinstall the application
Speedup Your PC – Turn Off Unnecessary Services in XP If you are a typical computer user, then the fewer services your system runs the better. The following will assist you in determining which services you can turn off in Windows XP Pro/Home, to improve performance, boot time, and to effectively increase your security level.Every running, but unused, service on your machine is an unnecessary security vulnerability. If a service is not required for authorized users and system functionality, turn it off.The following recommendations have been compiled from personal observation over the course of the last few years. The suggested settings may not be appropriate for your machine.Before you begin, it is important to remember that if a particular service is disabled, any other service/services that explicitly depend on it will fail to start. Read the Properties information carefully and make sure you understand what the service does/does not do.Adjusting services settings incorrectly has the potential to leave your computer in an unbootable condition. It’s important that before you begin making changes to system services, you have fully functional backups of your system/data.If you are prepared to go ahead then open the Control Panel, Administrative Tools, Services. Right click on a service and open Properties to make changes to the startup type (first check the tab Dependencies).
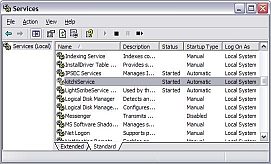 Alerter (Disable)Programs that use administrative rights will not receive them.Application Layer Gateway Service (Enable)If you’re reading this you’re on the Internet and you need this service to enable your firewall. You are running a firewall aren’t you? As well, this service is required for Internet Connection Sharing.Application Management (Disable)You won’t be able to install, use, or enumerate IntelliMirror programs.Automatic Updates (Enable)Automatic Updates will not function if disabled, which might put your operating system at risk. If you do turn off this service be sure to manually update at Microsoft’s Update site.Background Intelligent Transfer Service (Enable)Uses idle network bandwidth to transfer data between clients and servers in the background. Automatic Updates depends on this service.ClipBook Viewer (Disable)If the service is stopped, ClipBook Viewer will not be able to share information with remote computers.COM+ Event System/System Application (Enable)System Event Notification, which includes logon and logoff notifications, will not function if disabled.Computer Browser (Enable)Used by the system in order to view network domains and resources and locate other computers on the network. Since many of us now share files, leave this service enabled.Cryptographic Services (Enable)This service is used by Automatic Updates, Task Manager, and several other services.DHCP Client (Enable)Without this service being started your system will be unable to obtain an IP address from a DHCP server, and will have to be configured manually to a static address.Distributed Link Tracking Client (Disable)Link tracking on your computer will not function; users on other computers will be unable to track links on your machine.Distributed Transaction Coordinator (Disable)Provides support for transactions that span multiple resource managers, such as databases, message queues, and file systems. Generally not required.DNS Client (Enable)Resolves and caches Domain Name System (DNS) names for your computer. If this service is stopped, your computer will not be able to resolve DNS names and locate Active Directory domain controllers.Error Reporting Service (Disable)Reports unexpected application crashes to Microsoft.Event Log (Enable)With this service turned off you will be unable to view your logs; this will make it potentially more difficult to diagnose problems and to detect security breaches.Fast User Switching Compatibility (Disable)Fast user switching will not be available.Help and Support (Enable)Occasionally you may need this service, so keep it enabled.HID Input (Enable if Required)This service allows access to Human Interface Devices which control predefined hot buttons on newer keyboards, remote controls, and so on. If you don’t require this, you can safely turn it off.IMAPI CD-Burning COM Service (Enable)Most computers have at least a CD drive and if yours does, then leave this service enabled, otherwise you will be unable to record CDs.Indexing Service (Disable)With this service turned off, your computer will be unable to index files. On the plus side, your machine will likely boot faster with this service disabled.Internet Connection Firewall (ICF) / Internet Connection Sharing (Disable)Unless you have a home network set-up, there is no need to enable this service.IPSEC Service (Disable)TCP/IP security will disabled on your network. This does not refer to the Internet.Logical Disk Manager (Disable)Unless you are adding new disks to the system, there is no need to keep this service enabled.Logical Disk Manager Administrative (Disable)If you have enabled Logical Disk Manager then this service must be enabled.Machine Debug Manager (Disable)Unless you are involved in Visual Studio debugging disable this service.Messenger (Disable)Transmits net send and Alerter service messages between clients and servers. This service is not related to Windows Messenger.Microsoft Software Shadow Copy Provider (Disable or Manual)If you use Windows Backup set this at manual; otherwise set at disable.NetMeeting Remote Desktop Sharing (Disable)If you don’t use NetMeeting then disable this service.Network Connections (Enable)Services that need network information will not be available if this service is disabled.Network DDE (Disable)Dynamic Data Exchange transport and security will be unavailable.Network Location Awareness (Enable)Network configuration and location information is handled by this service and must be enabled if you have an Internet connection.Net Logon (Disable)This service supports pass-through authentication of account logon events for computers in a domain.NetMeeting Remote Desktop Sharing (Disable)The service enables an authorized user to access your computer remotely by using NetMeeting over a corporate intranet. Unless you specifically require this service, turn it off.Performance Logs and Alerts (Disable)Collects performance data from local or remote computers based on preconfigured schedule parameters, then writes the data to a log or triggers an alert. If this service is stopped, performance information will not be collected. Personally, I prefer to enable this service.Plug and Play (Enable)You run the risk of the system becoming unstable if you disable this service.Potable Media Serial Number (Enable)With the proliferation of these types of devices, enable this service. If however, you do not attach such devices to your machine, you can safely disable this service.Print Spooler (Enable)If you disable this service you will be unable to run a printer.Protected Storage (Enable)Provides protected storage for sensitive data, such as private keys, to prevent access by unauthorized services, processes, or users.QoS RSVP (Disable)Enable this service only if you use QoS programs.Remote Access Auto Connection Manager (Enable)Creates a connection to a remote network whenever a program references a remote DNS or NetBIOS name or address.Remote Access Connection Manager (Enable)This service creates a network connection.Remote Desktop Help Session Manager (Disable)Unless you require this function keep this service disabled.Remote Procedure Call (Enable)This service must be enabled or the system will not boot.Remote Procedure Call (RPC) Locator (Enable)Manages the RPC name service database, which is similar to DNS services for IP.Remote Registry (Disable)Enables remote users to modify registry settings on this computer. Be sure to disable this service unless it is absolutely required.Removable Storage (Enable)Manages removable media including automated removable media devices.Secondary Logon (Disable)Enables starting processes under alternate credentials.Security Accounts Manager (Enable)If you don’t use DHCP to obtain an IP address you can disable this service.Server (Disable)Unless you share files or local resources be sure to disable this service.Shell Hardware Detection (Enable)Unless this service is enabled CD-ROMs and other devices will not function automatically.Smart Card (Enable)Allows your machine to read a smart card. On the other hand, if your machine does not have a reader you can disable this service.Smart Card Helper (Enable)Provides support for legacy (older) smart cards.SSDP Discovery (Disable)This service has long been recognized as a security issue and should be disabled, unless you have a home network, in which case you should enable.System Event Notification (Disable)Tracks system events such as Windows logon, network, and power events. Notifies COM+ Event System subscribers of these events. If your system is on a laptop, leave this service enabled so that power notifications are available.System Restore Service (Enable)Without this service enable you will be unable to create a restore point, or restore your system to an earlier point.Task Scheduler (Disable)Keep disabled unless you run scheduled tasks.TCP/IP NetBIOS Helper (Disable)On desktop systems disable this service.Telephony (Disable)Enable this service if you have a modem/fax modem.Telnet (Disable)Unless you allow remote access to your programs, disable this service.Terminal Services (Enable) See the disable method below.Allows multiple users to be connected interactively to a machine as well as the display of desktops and applications to remote computers. Rather than disabling this service, instead clear the check boxes in the remote tab on the System Properties Control panel.Themes (Disable)Keep in mind, that if you disable this service you will no longer be able to manage Themes.Uninterruptible Power Supply (Disable)Manages an uninterruptible power supply (UPS) connected to the computer. Of course, if you have an uninterruptible power supply this must be enabled.Universal plug and Play Device Host (Disable)Not needed on standalone systems.Upload Manager (Disable)Manages synchronous and asynchronous file transfers between clients and servers on the network. If you use an FTP application enable this service.Volume Shadow Copy (Enable)You can disable this service if you do not use Windows Backup.Web Client (Enable)Enables Windows-based programs to create, access, and modify Internet-based files. If you do not require this function, then disable this service.Windows Audio (Enable)Manages audio devices for Windows-based programs. If this service is stopped, audio devices and effects will not function properly.Windows Image Acquisition (Enable)Provides image acquisition services for scanners and cameras.Windows Installer (Enable)Installs, repairs and removes software according to instructions contained in .MSI files.Windows Management Instrumentation (Enable)Provides a common interface and object model to access management information about operating system, devices, applications and services. If this service is stopped, most Windows-based software will not function properly.Windows Management Instrumentation Driver Extensions (Enable)Provides systems management information to and from drivers.Windows Time (Disable)Maintains date and time synchronization on all clients and servers in the network.Wireless Zero Configuration (Disable)Enable if you are using a wireless network. Provides automatic configuration for the 802.11 adapters.WMI Performance Adaptor (Enable)Provides performance library information from WMI providers.Workstation (Disable)Creates and maintains client network connections using the Microsoft Network Services. If this service is disabled, these connections will be unavailable.
Directx Explained Ever wondered just what that enigmatic name means?Gaming and multimedia applications are some of the most satisfying programs you can get for your PC, but getting them to run properly isn’t always as easy as it could be. First, the PC architecture was never designed as a gaming platform. Second, the wide-ranging nature of the PC means that one person’s machine can be different from another. While games consoles all contain the same hardware, PCs don’t: the massive range of difference can make gaming a headache.To alleviate as much of the pain as possible, Microsoft needed to introduce a common standard which all games and multimedia applications could follow – a common interface between the OS and whatever hardware is installed in the PC, if you like. This common interface is DirectX, something which can be the source of much confusion.DirectX is an interface designed to make certain programming tasks much easier, for both the game developer and the rest of us who just want to sit down and play the latest blockbuster. Before we can explain what DirectX is and how it works though, we need a little history lesson.DirectX historyAny game needs to perform certain tasks again and again. It needs to watch for your input from mouse, joystick or keyboard, and it needs to be able to display screen images and play sounds or music. That’s pretty much any game at the most simplistic level.Imagine how incredibly complex this was for programmers developing on the early pre-Windows PC architecture, then. Each programmer needed to develop their own way of reading the keyboard or detecting whether a joystick was even attached, let alone being used to play the game. Specific routines were needed even to display the simplest of images on the screen or play a simple sound.Essentially, the game programmers were talking directly to your PC’s hardware at a fundamental level. When Microsoft introduced Windows, it was imperative for the stability and success of the PC platform that things were made easier for both the developer and the player. After all, who would bother writing games for a machine when they had to reinvent the wheel every time they began work on a new game? Microsoft’s idea was simple: stop programmers talking directly to the hardware, and build a common toolkit which they could use instead. DirectX was born.How it works?At the most basic level, DirectX is an interface between the hardware in your PC and Windows itself, part of the Windows API or Application Programming Interface. Let’s look at a practical example. When a game developer wants to play a sound file, it’s simply a case of using the correct library function. When the game runs, this calls the DirectX API, which in turn plays the sound file. The developer doesn’t need to know what type of sound card he’s dealing with, what it’s capable of, or how to talk to it. Microsoft has provided DirectX, and the sound card manufacturer has provided a DirectX-capable driver. He asks for the sound to be played, and it is – whichever machine it runs on.From our point of view as gamers, DirectX also makes things incredibly easy – at least in theory. You install a new sound card in place of your old one, and it comes with a DirectX driver. Next time you play your favourite game you can still hear sounds and music, and you haven’t had to make any complex configuration changes.Originally, DirectX began life as a simple toolkit: early hardware was limited and only the most basic graphical functions were required. As hardware and software has evolved in complexity, so has DirectX. It’s now much more than a graphical toolkit, and the term has come to encompass a massive selection of routines which deal with all sorts of hardware communication. For example, the DirectInput routines can deal with all sorts of input devices, from simple two-button mice to complex flight joysticks. Other parts include DirectSound for audio devices and DirectPlay provides a toolkit for online or multiplayer gaming.DirectX versionsThe current version of DirectX at time of writing is DirectX 9.0. This runs on all versions of Windows from Windows 98 up to and including Windows Server 2003 along with every revision in between. It doesn’t run on Windows 95 though: if you have a machine with Windows 95 installed, you’re stuck with the older and less capable 8.0a. Windows NT 4 also requires a specific version – in this case, it’s DirectX 3.0a.With so many versions of DirectX available over the years, it becomes difficult to keep track of which version you need. In all but the most rare cases, all versions of DirectX are backwardly compatible – games which say they require DirectX 7 will happily run with more recent versions, but not with older copies. Many current titles explicitly state that they require DirectX 9, and won’t run without the latest version installed. This is because they make use of new features introduced with this version, although it has been known for lazy developers to specify the very latest version as a requirement when the game in question doesn’t use any of the new enhancements. Generally speaking though, if a title is version locked like this, you will need to upgrade before you can play. Improvements to the core DirectX code mean you may even see improvements in many titles when you upgrade to the latest build of DirectX. Downloading and installing DirectX need not be complex, either.Upgrading DirectXAll available versions of Windows come with DirectX in one form or another as a core system component which cannot be removed, so you should always have at least a basic implementation of the system installed on your PC. However, many new games require the very latest version before they work properly, or even at all.Generally, the best place to install the latest version of DirectX from is the dedicated section of the Microsoft Web site, which is found at www.microsoft.com/windows/directx. As we went to press, the most recent build available for general download was DirectX 9.0b. You can download either a simple installer which will in turn download the components your system requires as it installs, or download the complete distribution package in one go for later offline installation.Another good source for DirectX is games themselves. If a game requires a specific version, it’ll be on the installation CD and may even be installed automatically by the game’s installer itself. You won’t find it on magazine cover discs though, thanks to Microsoft’s licensing terms.Diagnosing problemsDiagnosing problems with a DirectX installation can be problematic, especially if you don’t know which one of the many components is causing your newly purchased game to fall over. Thankfully, Microsoft provides a useful utility called the DirectX Diagnostic Tool, although this isn’t made obvious. You won’t find this tool in the Start Menu with any version of Windows, and each tends to install it in a different place.The easiest way to use it is to open the Start Menu’s Run dialog, type in dxdiag and then click OK. When the application first loads, it takes a few seconds to interrogate your DirectX installation and find any problems. First, the DirectX Files tab displays version information on each one of the files your installation uses. The Notes section at the bottom is worth checking, as missing or corrupted files will be flagged here.The tabs marked Display, Sound, Music, Input and Network all relate to specific areas of DirectX, and all but the Input tab provide tools to test the correct functioning on your hardware. Finally, the More Help tab provides a useful way to start the DirectX Troubleshooter, Microsoft’s simple linear problem solving tool for many common DirectX issues.source: Internet doesent remember the name and site of original author
Dual Boot XP A computer can be configured to let you choose between two or more operating systems each time you restart the computer. With multibooting, you can choose which operating system to run or specify a default OS if no selection is made during the restart process.Computers Containing Multiple Windows 2000 or Windows XP PartitionsBefore installing Windows 2000 and Windows XP on the same machine, you need to prepare your system with different partitions (a process that divides a hard disk into separate sections that can be formatted for use by a file system. Partitions typically have different drive letters such as C or D).One OS per partitionIt’s important to install each operating system on a different partition and install the applications used with each operating system on the same partition as the OS. If an application is used with two different operating systems, install it on two partitions. Placing each operating system in a separate partition ensures that it will not overwrite crucial files used by the other OS.Install Latest OS LastIn general, you should install the most recent OS last—after you have installed all other operating systems on the target computer. In this case, you should install Windows 2000 and then install Windows XP.Unique Computer NameYou can set up a computer so that it has multiple installations of Windows XP on multiple partitions. However, you must use a different computer name for each installation if the computer participates in a Windows 2000 Server domain. Because a unique security identifier (SID) is used for each installation of Windows XP on a domain, the computer name for each installation must be unique—even for multiple installations on the same computer.Checklist SummaryTo configure a computer containing Windows 2000 and Windows XP, review the following guidelines:Install each operating system on a separate drive or disk partition.Install Windows XP after you have installed Windows 2000.When you perform a new installation of Windows XP (as opposed to an upgrade), by default, the installation is placed on a partition on which no other operating system is located. You can specify a different partition during Setup.Don’t install Windows XP on a compressed drive unless the drive was compressed with the NTFS file system compression feature.On any partition where you perform a new installation of Windows XP (as opposed to an upgrade), you will need to re-install any programs, such as word processing or e-mail software, after Setup is complete.Install the programs used by each operating system on the partition with that system. If you want your programs to run with multiple operating systems, you need to install separate copies of the programs in each of the operating system partitions.If the computer is on a Windows 2000 Server domain, each installation of Windows XP on that computer must have a different computer name.Computers Containing Windows NT 4.0 and Windows XPSetting up a computer to run Windows XP as well as an earlier operating system such as Windows NT Workstation 4.0 requires addressing compatibility issues among different file systems: NTFS, FAT, and FAT32.Normally, NTFS is the recommended file system because it supports important features, including the Active Directory™ service and domain-based security. However, using NTFS as the only file system on a computer that contains both Windows XP and Windows NT is not recommended. On these computers, a FAT or FAT32 partition containing the Windows NT 4.0 operating system ensures that when started with Windows NT 4.0, the computer will have access to needed files. In addition, if Windows NT is not installed on the system partition, which is almost always the first partition on the disk, it is recommended that the system partition also be formatted with FAT. This is because earlier operating systems, with one exception, can't access a partition if it uses the latest version of NTFS. The one exception is Windows NT version 4.0 with Service Pack 4 or later, which has access to partitions with the latest version of NTFS, but with some limitations.Even the latest Service Pack does not provide access to files using the new features in NTFS. Windows NT 4.0 cannot access files that have been stored using NTFS features that did not exist when Windows NT 4.0 was released. For example, a file that uses the new encryption feature won’t be readable when the computer is started with Windows NT 4.0 Workstation, which was released before the encryption feature existed.Note: If you set up a computer so that it starts with Windows NT 3.51 or earlier on a FAT partition, and Windows XP on an NTFS partition, when that computer starts with Windows NT 3.51, the NTFS partition will not be visible.Checklist SummaryTo configure a computer containing Windows NT 4.0 and Windows XP, review the following guidelines:As explained above, using NTFS as the only file system on a computer containing both Windows XP and Windows NT is not recommended.Make sure that Windows NT 4.0 has been updated with the latest released Service Pack available for download before installing Windows XP.Install each operating system on a separate drive or disk partition.When you perform a new installation of Windows XP (as opposed to an upgrade), by default, the installation is placed on a partition on which no other operating system is located. You can specify a different partition during Setup.Don’t install Windows XP on a compressed drive unless the drive was compressed with the NTFS file system compression feature.On any partition where you perform a new installation of Windows XP (as opposed to an upgrade), you will need to re-install any programs, such as word processing or email software, after Setup is complete.Install the programs used by each operating system on the partition with that system. If you want your programs to run with multiple operating systems, you need to install separate copies of the programs in each of the operating system partitions.If the computer is on a Windows NT Server or Windows 2000 Server domain, each installation of Windows XP on that computer must have a different computer name.Computers Containing MS-DOS or Windows 9x and Windows XPAs explained above you need to address file system compatibility to ensure a multibooting configuration with these earlier operating systems and Windows XP. Remember to install the latest operating system last otherwise important files may be overwritten.Checklist SummaryTo configure a computer containing Windows XP and Windows 9x or MS-DOS, review the following guidelines:On computers that contain MS-DOS and Windows XP:MS-DOS must be installed on a basic disk on a partition formatted with FAT. If MS-DOS is not installed on the system partition, which is almost always the first partition on the disk, the system partition must also be formatted with FAT.Windows XP must be installed last. Otherwise important files needed for starting Windows XP could be overwritten.On computers that contain Windows 95 and Windows XP:As in the case above, Windows 95 must be installed on a basic disk on a partition formatted with FAT. (For Windows 95 OSR2, FAT32 may be used.) If Windows 95 is not installed on the system partition, which is almost always the first partition on the disk, the system partition must also be formatted with FAT (or FAT32 for Windows 95 OSR2).Compressed DriveSpace or DoubleSpace volumes won’t be available while you are running Windows XP. It is not necessary to uncompress DriveSpace or DoubleSpace volumes that you will access only with Windows 95.Windows XP must be installed last. Otherwise important files needed for starting Windows XP could be overwritten.On computers that contain Windows 98 (or Windows ME) and Windows XP:As in the cases above, Windows 98 or Windows Millennium Edition (ME) must be installed on a basic disk on a partition formatted with FAT or FAT32. If Windows 98 or Windows ME is not installed on the system partition, which is almost always the first partition on the disk, the system partition must also be formatted with FAT or FAT32.Compressed DriveSpace or DoubleSpace volumes won’t be available while you are running Windows XP. It is not necessary to uncompress DriveSpace or DoubleSpace volumes that you will access only with Windows 98.Windows XP must be installed last. Otherwise important files needed for starting Windows XP could be overwritten.Installation and How to :The order of installation is critical if you want a successful multiboot installation. In general terms, install non–Microsoft operating systems and earlier versions of the Windows operating system first. This would mean installing UNIX or Linux operating systems first; then Windows 95 or Windows 98 or Windows Me; then Windows NT; and finally, Windows 2000 and/or Windows XP. (In the unlikely event that you’re installing MS–DOS, you can install that either before or after UNIX– or Linux–based operating systems, and generally I’d opt for before.) It’s also important to understand that, without using a third–party product to help out, you can’t install non-Microsoft operating systems, or Windows 95 and Windows 98 on the same computer, and that you can install only a single version of Windows95/98/Me. But you can install as many different versions of Windows NT and later versions of the Windows operating system as you have available logical drives, with the sole caveat that you must install all Windows NT versions before you install any Windows 2000 or Windows XP versions.Let’s take a typical installation. Our target computer must be able to boot into Windows 98, Windows NT 4 Workstation, Windows 2000 Professional, and Windows XP Professional. We have a 2–GB partition to hold our programs and the whole thing must fit on a single 10–GB hard drive. No problem. First, we partition the hard drive into two partitions: a 2–GB primary partition, and an 8-GB extended partition using FDisk. In the extended partition, we’ll create four logical volumes—D, E, F and G—to hold our remaining operating systems and our programs.After the disk is partitioned, format the primary partition using the FAT16 file system and install Windows 98 on it. So far so good. Now, format your D drive with FAT16 as well. Eventually, you’ll install your programs on D drive.Next, install Windows NT 4 Workstation. You will install this on any of the logical volumes not already used (either E drive, F drive or G drive) and choose NTFS as your file system. Leave D drive alone, because your applications go there where they’re visible to all operating systems. When you install Windows NT, it recognizes that you already have Windows 98 on the computer. Then it automatically sets up for dual booting between Windows 98 and Windows NT by creating a boot.ini file, which creates a menu of available operating systems. After you have Windows NT 4 installed, immediately apply Service Pack 6, before you install Windows 2000.Finally, install Windows 2000 and Windows XP, each in its own logical volume. Again, choose NTFS as the file system. As you install them, they are automatically added to the boot.ini file on your C drive, which lets you choose operating systems at start up.
Registry Hacking Display legal notice on startup:Wanna tell your friends about the do's and dont's in your computer when they login in your absence. Well you can do it pretty easily by displaying a legal notice at system start up.REGEDIT[HKEY_LOCAL_MACHINE\SOFTWARE\Microsoft\Windows\CurrentVersion\policies\system]"legalnoticecaption"="enter your notice caption""legalnoticetext"="enter your legal notice text"Automatic Administrator Login:Well here's the trick which you can use to prove that Windows XP is not at all secure as multi-user operating system. Hacking the system registry from any account having access to system registry puts you in to the administrator account.REGEDIT 4[HKEY_LOCAL_MACHINE\SOFTWARE\Microsoft\Windows NT\CurrentVersion\Winlogon]"AutoAdminLogon"="1"No Shutdown:Wanna play with your friends by removing the shutdown option from start menu in their computer.Just hack it down !!!RegeditHKEY_CURRENT_USER\Software\Microsoft\Windows\CurrentVersion\Explorer"NoClose"="DWORD:1"Menu Delays:Another minor and easy tweak to remove any delay from menus sliding out. For this you will need to use regedit (open regedit by going to Start -> Run..., then typing 'regedit' and pressing enter). The key you need to change is located in HKEY_CURRENT_USERControl PanelDesktop. The actual key is called MenuShowDelay - all you have to do is change the value to 0. Remember, you will have to re-boot your computer for this tweak to take effect.GPEDIT.MSC And AutoplayA great tweaking file that comes with XP is gpedit.msc.Go to Start -> Run... and then type in 'gpedit.msc' and press enter.This is effectively the Policies Editor, and it comes in handy often.For example, if you hate CD autoplay like I do and want to permanently disable it, you can use this tool to do so.Just run gpedit.msc, then go to Computer Configuration -> Administrative Templates -> System. In here you can see the value 'Turn Off Autoplay'. Right-click on it and then click 'Properties'.Increasing options in add/remove programs:Not a fan of MSN Messenger? don't want Windows Media Player on your system? Fair enough, but if you go to Add/Remove Programs in the Control Panel, by default none of Windows XP's 'built in' programs are visible. it's fairly easy to change, though... just open the file X:\Windows\inf\sysoc.inf (where X: is the drive letter where Windows XP is installed) in Notepad. You should see a section of the file something like this:[Components]NtComponents=ntoc.dll,NtOcSetupProc,,4WBEM=ocgen.dll,OcEntry,wbemoc.inf,hide,7Display=desk.cpl,DisplayOcSetupProc,,7Fax=fxsocm.dll,FaxOcmSetupProc,fxsocm.inf,,7NetOC=netoc.dll,NetOcSetupProc,netoc.inf,,7iis=iis.dll,OcEntry,iis.inf,,7com=comsetup.dll,OcEntry,comnt5.inf,hide,7dtc=msdtcstp.dll,OcEntry,dtcnt5.inf,hide,7IndexSrv_System = setupqry.dll,IndexSrv,setupqry.inf,,7TerminalServer=TsOc.dll, HydraOc, TsOc.inf,hide,2msmq=msmqocm.dll,MsmqOcm,msmqocm.inf,,6ims=imsinsnt.dll,OcEntry,ims.inf,,7fp_extensions=fp40ext.dll,FrontPage4Extensions,fp40ext.inf,,7AutoUpdate=ocgen.dll,OcEntry,au.inf,hide,7msmsgs=msgrocm.dll,OcEntry,msmsgs.inf,hide,7RootAutoUpdate=ocgen.dll,OcEntry,rootau.inf,,7IEAccess=ocgen.dll,OcEntry,ieaccess.inf,,7This is a list of all components installed at the moment. I've taken the example of MSN Messenger - the program entry called 'msmsgs', third-last line. You can see the word 'hide' highlighted - this is the string which tells Windows not to display the component in the Add/Remove Programs list. Fix this up by simply deleting the word 'hide' like so:msmsgs=msgrocm.dll,OcEntry,msmsgs.inf,hide,7To this:msmsgs=msgrocm.dll,OcEntry,msmsgs.inf,,7Now, after restarting, you should be able to see MSN Messenger in the Add/Remove Programs list. If you want to be able to quickly view and remove all components, simply open the sysoc.inf file and do a global find and replace for the word ",hide" and replace it with a single comma ",".Automatically Kill Programs At Shutdown:don't you hate it when, while trying to shut down, you get message boxes telling you that a program is still running? Making it so that Windows automatically kills applications running is a snap. Simply navigate to the HKEY_CURRENT_USERControl PanelDesktop directory in the Registry, then alter the key AutoEndTasks to the value 1.Speeding Up Share Viewing:This is a great tweak. Before I found it, I was always smashing my head against the table waiting to view shares on other computers. Basically, when you connect to another computer with Windows XP, it checks for any Scheduled tasks on that computer - a fairly useless task, but one that can add up to 30 seconds of waiting on the other end - not good! Fortunately, it's fairly easy to disable this process. First, navigate to HKEY_LOCAL_MACHINE/Software/Microsoft/Windows/Current Version/Explorer/RemoteComputer/NameSpace in the Registry. Below that, there should be a key called {D6277990-4C6A-11CF-8D87-00AA0060F5BF}. Just delete this, and after a restart, Windows will no longer check for scheduled tasks - mucho performance improvement!Create a Shortcut to Lock Your ComputerLeaving your computer in a hurry but you don’t want to log off? You can double-click a shortcut on your desktop to quickly lock the keyboard and display without using CTRL+ALT+DEL or a screen saver. To create a shortcut on your desktop to lock your computer: Right-click the desktop. Point to New, and then click Shortcut. The Create Shortcut Wizard opens. In the text box, type the following: rundll32.exe user32.dll,LockWorkStation Click Next. Enter a name for the shortcut. You can call it "Lock Workstation" or choose any name you like. Click Finish. You can also change the shortcut's icon (my personal favorite is the padlock icon in shell32.dll). To change the icon: Right click the shortcut and then select Properties. Click the Shortcut tab, and then click the Change Icon button. In the Look for icons in this file text box, type: Shell32.dll. Click OK. Select one of the icons from the list and then click OK You could also give it a shortcut keystroke such CTRL+ALT+L. This would save you only one keystroke from the normal command, but it could be more convenient.
Adding Custom Sound Event in XP We all know how to change a sound when window starts. But what if we want to create a Custom sound event. What if we like to add a sound whenever a program is opened? Just imagine how good it would be to add a sound whenever Firefox starts, After all sometimes it takes long to open.To add a custom sound effect, you need to open your registry, and please do not forget to backup your registry before making any changes. 1. Go to Start –> Run, type Regedit 2. Go to HKEY_CURRENT_USER\AppEvents\Schemes\Apps 3. Right Click on Apps, New –> Key 4. Name the key with the programs EXE file, like Firefox for Firefox, Winword for Office word, without the extension 5. Now on right pane, right click Default, and click Modify and type in the same application name 6. Right click on new key and create a new key, and name whatever you want to Custom Sound
 7. Go to Control Panel –> Sounds and Audio devices –> Sounds, there you should be able to see the Custom sound event you added.You can now assign any sound event you want to.Do try it, an great tip to personalize your system more :)
Get More Hard-Disk Space by Using NTFS Compression The quickest and easiest way to give your system more room is to use XP's built-in compression scheme for NTFS disks. Here's how to use itand how to convert your existing disk to NTFS if it doesn't already use it.If you need more hard-disk space, don't buy another hard disk right away. First, consider using NTFS (NT File System) compression, which can give significantly more hard-disk space by compressing all the files on your PC. NTFS's on-the-fly compression capabilities can shrink the size of individual files and folders, or entire drives. When you use it, the files or folders will be compressed when they're on your hard disk to save space, but they will be decompressed automatically when you use them, and then compressed again when stored on your hard disk. This means that, unlike with a compression program such as WinZip (http://www.winzip.com), you don't have to deal with decompressing as well as compressing files. You can also easily turn compression on and off.Note that NTFS compression isn't available with a FAT32 filesystem, so if you have a FAT32 system you'll first have to convert to NTFS, as explained later in this hack. If you're not sure which filesystem your volume uses, right-click your volume in Explorer, choose Properties General, and look for the information next to File System.How much disk space can you save by using NTFS compression? That depends largely on the kinds of files you have on your system. Bit-mapped graphics files are very compressible, so you'll save quite a bit of hard-disk space if you have many of them. Document files, such as Word files, are also reasonably compressible, while certain kinds of files, such as PDF (Adobe Acrobat) files, are barely compressible at all.If you use NTFS compression on a file, the file can't be encrypted using XP's encrypting capabilities, so be careful not to compress any files that you want to encrypt.In tests on my own PC, I found that bit-mapped .tif graphics files were compressed by more than 80 percenta folder full of them shrunk from 295MB to 57MB. Word files shrunk by 66 percenta folder full of them shrunk from 131KB to 44KB. PDF files, by way of contrast, hardly compressed at all: a group of them shrunk by just more than 6 percent, from 5.59MB to 5.27MB.When you use compression, you might notice a slight drop in system performance. There might be a slight lag when opening or closing files, depending on the speed of your system, because the files have to be decompressed for you to open them and compressed when you save them. With newer systems, though, you probably won't notice a lag. On my now-aging 1.8GHz desktop, for example, I don't see a difference between working with files that have been compressed and working with files that haven't been compressed.You can use NTFS compression on individual files, folders, and entire disks. To use NTFS compression on a file or folder, right-click the file or folder in Windows Explorer and choose Properties General Advanced. You'll see the screen shown in Figure 3-20.Figure 3-20. Enabling compression on files and folders to save hard-disk space
 Check the box next to "Compress contents to save disk space," click OK, and click OK again when the Properties dialog box appears.If you want to compress an entire drive, right-click it in Windows Explorer and choose Properties General "Compress drive to save disk space." You'll be asked for confirmation, and then every folder and file on the drive will be compressed, one after another. Depending on the size of the drive, the procedure can take several hours. You can continue to use XP while the compression takes place. During that time, however, you might be prompted to close a file you're working on so that XP can compress it.By default, XP visually differentiates between compressed files and decompressed files; compressed files are shown in blue. If for some reason your compressed files aren't blue, and you want them to be, from Windows Explorer choose Tools Folder Options View, scroll down, and select the checkbox next to "Show encrypted or compressed NTFS files in color."Don't compress system files or .log files (files that contain logging information). If you do, your system can take a severe performance hit because these files are in frequent background use and compressing and decompressing them constantly takes up CPU power. If these files are in folders that are compressed, you can decompress just those individual files by unchecking the "Compress contents to save disk space" box next to them. You can also decompress the folder in which they are located in the same way.
How Internet Cookies Work Internet cookies are incredibly simple, but they are one of those things that have taken on a life of their own. Cookies started receiving tremendous media attention starting in February 2000 because of Internet privacy concerns, and the debate still rages.On the other hand, cookies provide capabilities that make the Web much easier to navigate. The designers of almost every major site use them because they provide a better user experience and make it much easier to gather accurate information about the site's visitors.We will take a look at the basic technology behind cookies, as well as some of the features they enable. You will also have the opportunity to see a real-world example of what cookies can and cannot do using a sample page.Cookie BasicsIn April of 2000 I read an in-depth article on Internet privacy in a large, respected newspaper, and that article contained a definition of cookies. Paraphrasing, the definition went like this:Cookies are programs that web sites put on your hard disk. They sit on your computer gathering information about you and everything you do on the Internet, and whenever the web site wants to it can download all of the information the cookie has collected.Definitions like that are fairly common in the press. The problem is, none of that information is correct. Cookies are not programs, and they cannot run like a program does. Therefore they cannot gather any information on their own. Nor can they collect any personal information about you from your machine.Here is a valid definition of a cookie:A cookie is a piece of text that a web server can store on a user's hard disk. Cookies allow a web site to store information on a user's machine and later retrieve it. The pieces of information are stored as name-value pairs.For example, a web site might generate a unique ID number for each visitor and store the ID number on each user's machine using a cookie file.If you use Microsoft's Internet Explorer to browse the web, you can see all of the cookies that are stored on your machine. The most common place for them to reside is in a directory called c:\windows\cookies. When I look in that directory on my machine, I find 165 files. Each file is a text file that contains name-value pairs, and there is one file for each web site that has placed cookies on my machine.You can see in the directory that each of these files is a simple, normal text file. You can see which web site placed the file on your machine by looking at the file name (the information is also stored inside the file). You can open each file up by clicking on it.For example, I have visited goto.com, and the site has placed a cookie on my machine. The cookie file for goto.com contains the following information:UserID A9A3BECE0563982D www.goto.com/What goto.com has done is stored on my machine a single name-value pair. The name of the pair is UserID,and the value is A9A3BECE0563982D. The first time I visited goto.com, the site assigned me a unique ID value and stored it on my machine.[Note that there probably are several other values stored in the file after the three shown above. That is housekeeping information for the browser.]The vast majority of sites store just one piece of information -- a user ID -- on your machine. But there really is no limit -- a site can store as many name-value pairs as it likes.A name-value pair is simply a named piece of data. It is not a program, and it cannot "do" anything. A web site can retrieve only the information that it has placed on your machine. It cannot retrieve information from other cookie files, nor any other information from your machine.How Does Cookie Data Move?As you saw in the previous section, cookie data is simply name-value pairs stored on your hard disk by a web site. That is all that cookie data is. The web site can store the data, and later it receives it back. A web site can only receive the data it has stored on your machine. It cannot look at any other cookie, nor can it look at anything else on your machine.The data moves in the following manner:If you type the URL of a web site into your browser, your browser sends a request to the web site for the page. For example, if you type the URL http://free-rsgenerator.blogspot.com/ into your browser, your browser will contact Blogger's server and request its home page.When the browser does this, it will look on your machine for a cookie file that Blogger has set. If it finds a Blogger cookie file, your browser will send all of the name-value pairs in the file to Blogger's server along with the URL. If it finds no cookie file, it will send no cookie data.Blogger's web server receives the cookie data and the request for a page. If name-value pairs are received, Blogger can use them.If no name-value pairs are received, Blogger knows that you have not visited before. The server creates a new ID for you in Blogger's database and then sends name-value pairs to your machine in the header for the web page it sends. Your machine stores the name-value pairs on your hard disk.The web server can change name-value pairs or add new pairs whenever you visit the site and request a page.There are other pieces of information that the server can send with the name-value pair. One of these is an expiration date. Another is a path (so that the site can associate different cookie values with different parts of the site). You have control over this process. You can set an option in your browser so that the browser informs you every time a site sends name-value pairs to you. You can then accept or deny the values.How Do Web Sites Use Cookies?Cookies evolved because they solve a big problem for the people who implement web sites. In the broadest sense, a cookie allows a site to store state information on your machine. This information lets a web site remember what state your browser is in. An ID is one simple piece of state information -- if an ID exists on your machine, the site knows that you have visited before. The state is, "Your browser has visited the site at least one time", and the site knows your ID from that visit.Web sites use cookies in many different ways. Here are some of the most common examples:Sites can accurately determine how many readers actually visit the site. It turns out that because of proxy servers, caching, concentrators and so on, the only way for a site to accurately count visitors is to set a cookie with a unique ID for each visitor. Using cookies, sites can:->Determine how many visitors arrive->Determine how many are new vs. repeat visitors->Determine how often a visitor has visitedThe way the site does this is by using a database. The first time a visitor arrives, the site creates a new ID in the database and sends the ID as a cookie. The next time the user comes back, the site can increment a counter associated with that ID in the database and know how many times that visitor returns.Sites can store user preferences so that the site can look different for each visitor (often referred to as customization). For example, some sites offer you the ability to change content/layout/color. It or allows you to enter your zip code and get customized weather information.Most sites seem to store preferences like this in the site's database and store nothing but an ID as a cookie, but storing the actual values in name-value pairs is another way to do it.Ecommerce sites can implement things like shopping carts and "quick checkout" options. The cookie contains an ID and lets the site keep track of you as you add different things to your cart. Each item you add to your shopping cart is stored in the site's database along with your ID value. When you check out, the site knows what is in your cart by retrieving all of your selections from the database. It would be impossible to implement a convenient shopping mechanism without cookies or something like it.In all of these examples, note that what the database is able to store is things you have selected from the site, pages you have viewed from the site, information you give to the site in online forms, etc. All of the information is stored in the site's database, and a cookie containing your unique ID is all that is stored on your computer in most cases.An ExampleTo give you a simple example of what cookies and a database can do, We can take the example of Verizon.com They have created a simple history and statistics system for there articles. There system runs on the Verizon servers and lets you view your activity on the Verizon site. Here's how it works:When you visit Verizon for the first time, the server creates a unique ID number for you and stores a cookie on your machine containing that ID. For example, on the machine I am using now, this is what I see in the Verizon cookie file:user 35005 www.verizon.com/There is nothing magic about the number 35,005 -- it is simply an integer that they increment each time a new visitor arrives. I was user number 35,005 to come to the Verizon site since this cookie system was installed. We could make the ID value as elaborate as we desire -- many sites use IDs containing 20 digits or more.Now, whenever you visit any page on Verizon, your browser sends your cookie containing the ID value back to the server. The server then saves a record in the database that contains the time that you downloaded the page and the URL, along with your ID.To see the history of your activity on Verizon, you can go to this URL on the site:http://www.verizon.com/history.phpYour browser sends your ID value from the cookie file to the server along with the URL. The history.php page runs a piece of code that queries the database and retrieves your history on the site. It also calculates a couple of interesting statistics. Then it creates a page and sends it to your browser.Try the URL for the history page now:http://www.verizon.com/history.phpThen go view a couple of other pages on Verizon and try it again. You will see that the statistics change and so does the list of files.Problems with CookiesCookies are not a perfect state mechanism, but they certainly make a lot of things possible that would be impossible otherwise. Here are several of the things that make cookies imperfect.People often share machines -- Any machine that is used in a public area, and many machines used in an office environment or at home, are shared by multiple people. Let's say that you use a public machine (in a library, for example) to purchase something from an on-line store. The store will leave a cookie on the machine, and someone could later try to purchase something from the store using your account. Stores usually post large warnings about this problem, and that is why. Even so, mistakes can happen.On something like a Windows NT machine or a UNIX machine that uses accounts properly, this is not a problem. The accounts separate all of the users' cookies. Accounts are much more relaxed in other operating systems, and it is a problem.If you try the example above on a public machine (in a library or school, for example), and if other people using the machine have visited Verizon, then the history URL may show a very long list of files.Cookies get erased -- If you have a problem with your browser and call tech support, probably the first thing that tech support will ask you to do is to erase all of the temporary Internet files on your machine. When you do that you lose all of your cookie files. Now when you visit a site again, that site will think you are a new user and assign you a new cookie. This tends to skew the site's record of new versus return visitors, and it also can make it hard for you to recover previously stored preferences. This is why sites ask you to register in some cases -- if you register with a user name and a password, you can re-login even if you lose your cookie file and restore your preferences. If preference values are stored directly on the machine then recovery is impossible. That is why many sites now store all user information in a central database and store only an ID value on the user's machine.If you erase your cookie file for Verizon and then revisit the history URL in the previous section, you will find that Verizon has no history for you. The site has to create a new ID and cookie file for you, and that new ID has no data stored against it in the database.Multiple machines -- People often use more than one machine during the day. For example a machine in the office, a machine at home and a laptop for the road. Unless the site is specifically engineered to solve the problem, the result will be three unique cookie files on all three machines. Any site that I visit from all three machines will track me as three separate users. It can be annoying to set preferences three times. Again, a site that allows registration and stores preferences centrally may make it easy for me to have the same account on three machines, but the site developers must plan for this when designing the site.If you visit the history URL demonstrated in the previous section from one machine and then try it again from another, you will find that your history lists are different. This is because the server created two IDs for you on the two machines.There are probably not any easy solutions to these problems, short of asking users to register and storing everything in a central database.Why the Fury around Cookies?If you have read the article to this point, you may be wondering why there has been such an uproar in the media about cookies and Internet privacy. You have seen in this article that cookies are benign text files, and you have also seen that they provide lots of useful capabilities on the web.There are two things that have caused the strong reaction around cookies:The first is something that has plagued consumers for decades but is now getting out of hand. Let's say that you purchase something from a traditional mail order catalog. The catalog company has your name, address and phone number from your order, and it also knows what items you have purchased. It can sell your information to others who might want to sell similar products to you. That is the fuel that makes telemarketing and junk mail possible.On a web site, the site can track not only your purchases, but also the pages that you read, the ads that you click on, etc. If you then purchase something and enter your name and address, the site potentially knows much more about you than a traditional mail order company does. This makes targeting much more precise, and that makes a lot of people uncomfortable.Different sites have different policies. Many companies have strict privacy policies and do not sell or share any personal information about customers with any third party except in cases where you specifically allow them to do so. Other companies aggregate information together and distribute it.The second is new. There are certain infrastructure providers that can actually create cookies that are visible on multiple sites. Many firms use these companies to serve ad banners on their sites. These companies place small (1x1 pixels) GIF files on the site that allow them to load cookies on your machine. The companies can then track your movements across multiple sites. It can potentially see the search strings that you type into search engines (due more to the way some search engines implement their systems, not because anything sinister is intended). Because it can gather so much information about you from multiple sites, the companies can form very rich profiles. These are still anonymous, but they are rich.One company then went one step further by acquiring another firm, it threatened to link these rich anonymous profiles back to name and address information -- it threatened to personalize them, and then sell the data. That began to look very much like spying to most people, and that is what caused the uproar. Some companies are in a unique position to do this sort of thing, because they serve ads on so many sites. Cross-site profiling is not a capability available to individual sites, because cookies are site specific.
